Debunked: 120-mile shot of San Jacinto proves flat earth

Rory

Closed Account
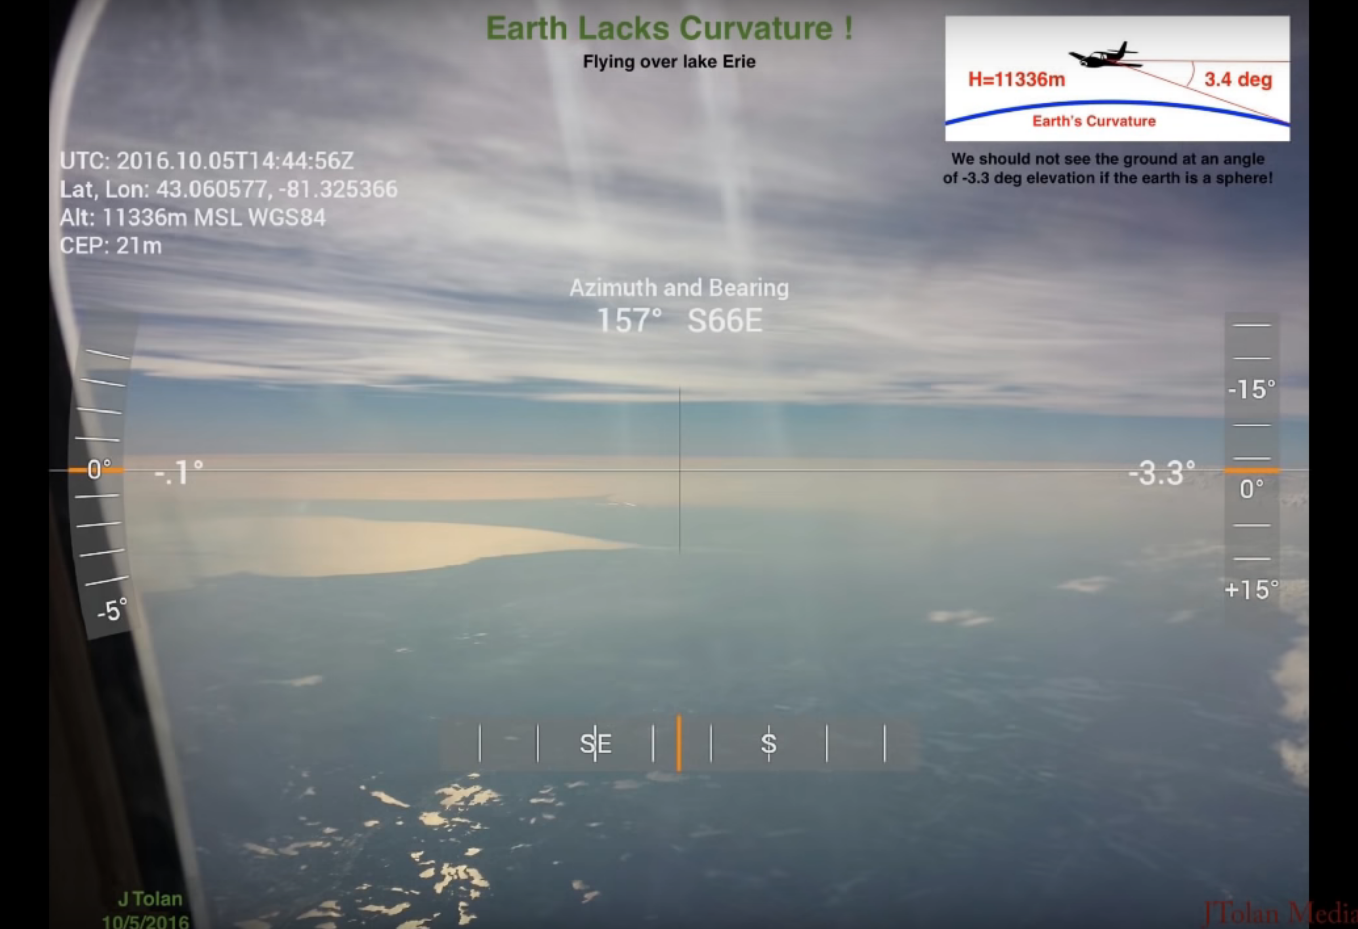
YouTube user JTolan Media 1 has uploaded a video which shows images of San Jacinto Peak in California taken from Malibu, 120 miles away. He believes this is proof that the Earth is flat:


Source: www.youtube.com/watch?v=7-pXWRn_wfk (start at around 9:48 - before that is preamble)

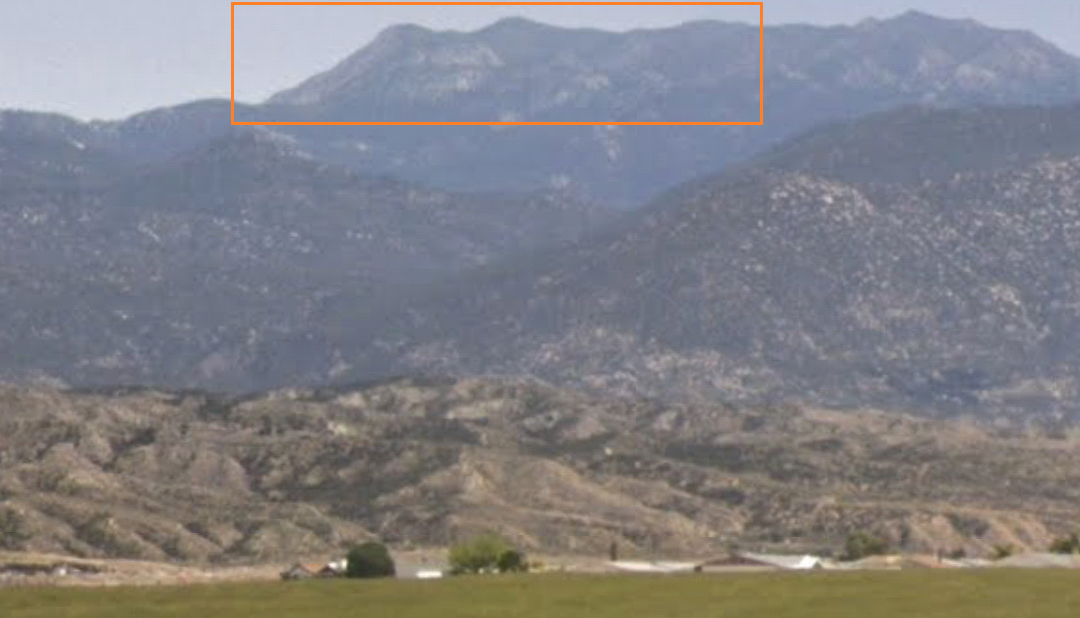
His main piece of evidence is this image here (contrast adjusted):

mt jacinto.JPG

He gives his observation location as 34.032204, -118.702984 and his altitude as 150 feet. This seems accurate enough. So where has he gone wrong in believing he's seeing something that shouldn't be seen on a spherical Earth?

The curve calculator predicts a hidden amount for those figures of 6,158 feet. San Jacinto Peak is 10,834 feet above sea level. This leaves a predicted visible amount of 4,676 feet.

Likewise, peakfinder has no problem with San Jacinto being visible from that spot:

upload_2018-12-17_10-24-59.png
Source: peakfinder.org

And this is a fuller image of that mountain range, taken from an elevated location much closer to San Jacinto, to give a picture of what the mountain actually looks like, free from obscuration:

upload_2018-12-17_11-17-54.png
Source: peakfinder.org

Indian Mountain, to the right of San Jacinto, summits at 5,790 feet, so what we're seeing in JTolan's video should be the portion of the mountain range a few hundred feet above that. Basically, this:

peakfinder1.jpg

As there are hills in the way, though, what we're actually seeing is merely the very top portion of the range, from around Castle Rocks, at 8600 feet, upwards:

san jacinto.gif

Working out which hills are obscuring the range and calculating the predicted visible amount would be the final step here. It's probably about 2,200 feet for the sphere Earth, but substantially more for the hypothetical flat.
 
Last edited:
I was struggling to find a photo of what San Jacinto actually looks like in full from that direction, but I just came across this one:


Source: https://imgur.com/a/HWZZLoM

The red boxed part equates to the area JTolan shows in his photo.

There's no information about a location here, but it claims to be taken from roughly the same angle.

On another note, JTolan is the chap we've seen before, who shoots images with 'an infrared camera'. He believes it shows him something more than a normal camera can see. I've even heard it claimed, by a different flat earther, that "the infrared camera filter takes out all refraction, atmospheric lensing, and any mirage effects you might normally see on a hot day or where there's high humidity."

Now, I don't know much about infrared cameras, but I know they certainly can't "remove refraction".

Also, I'm used to seeing them shooting footage where people's heads' glow white and cold things show dark; JTolan's images look more like simple black and white photography to me.

In the video above, from about 8:00, he says a little about his set-up. It's made up of:
  • Monochrome astronomy camera
  • Celestron spotting scope
  • 850nm infrared filter
I'll bet we have some on here who understand what that filter actually does. But, in the meantime, if I go by a quick peruse of the wikipedia article on infrared photography I can learn that: this type of photography is termed "near-infrared", as opposed to thermal imaging, which is called "far-infrared"; that it's good for penetrating atmospheric haze; and that it's mainly just a way to create a nice, dreamlike photo effect - though it can, as JTolan says, sometimes reveal things that are otherwise difficult to see:


Visible vs. Infrared (900 nm LP) Aerial Photography of Old Hickory Lake, Tennessee, taken seconds apart.
Nice, Rory. This is the same JTolan who posted an earlier infrared video from a plane, which clearly showed the the amount of curvature that agrees with Walter Brislin's calculator, as already shown here;
https://www.metabunk.org/measuring-...horizon-with-a-level.t7832/page-3#post-224168

The absurd thing was the number of FE belivers crowing about "no curve" and "believe your eyes" in the comments, until too many debunkers had shown the curve in screenshots.
 
I've come across a new tool similar to peakfinder which is great at identifying the obscuring ridges. This is the image it gives us for that shot to San Jacinto:

san jacinto from panorama maker.jpg
https://www.udeuschle.de/panoramas/panqueryfull.aspx?mode=newstandard&data=lon:-118.702984$$$lat:34.032204$$$alt:45$$$altcam:1$$$hialt:false$$$resolution:600$$$azimut:97.3$$$sweep:6$$$leftbound:94.3$$$rightbound:100.3$$$split:2$$$splitnr:3$$$tilt:0.111111111111111$$$tiltsplit:false$$$elexagg:1.2$$$range:300$$$colorcoding:false$$$colorcodinglimit:215$$$title:Malibu to San Jacinto$$$description:$$$email:$$$language:en$$$screenwidth:1366$$$screenheight:768

This shows the obscuring ridge is 19.7 to 20 miles away, at an elevation of 390 to 476 feet.

Using Google Earth, meanwhile, shows that the obscuring ridge on a flat earth model would be one either 56 or 87.9 miles away:

san jac profile.jpg

Entering these figures into my obscuration calculator, I get the following:

upload_2018-12-31_13-32-55.png

Some notes about the above:
  • The predicted visible amount for the sphere earth is based on the height of the ridge directly beneath the peak. 2350 feet tallies pretty nicely with what we see on peakfinder and in reality.
  • There are different figures for the target landmark because the line of sight hits the main body of the mountain in different places depending on the model, as can be seen in the elevation profile above.
  • I noted two different ridges that could be obscuring the flat earth view. The other ridge returns 8085 feet; basically the same.
  • I haven't done the more complex trig which factors in for the tilt. The reason I can't just use the same formula for the Pikes Peak shot is because that one had an obstruction and target below horizontal, and in this one they're both above horizontal. Slightly different formula, and it would take a quite a bit of work to rejig the equation - it's nearly four lines long! Given that the last one returned only a 0.3% difference, I think I can be happy enough with the more basic calculation.
I also found another nice shot of much more of San Jacinto, taken from Lake Mathews, which is about 40 miles from the mountain, and 3 miles south of the line of sight:

mt jacinto5.jpg
Source: https://www.flickr.com/photos/clarence_w/2442230154/

The black box shows the portion photographed in JTolan's image.
 
Last edited:
I also found another nice shot of much more of San Jacinto, taken from Lake Mathews, which is about 40 miles from the mountain, and 3 miles south of the line of sight:

View attachment 35550

The black box shows the portion photographed in JTolan's image.
Rory, the dam at Lake Matthews faces northwest. Mt. San Jacinto is straight east. That is a view of Mt. San Antonio, not San Jacinto.

Ah! That's Mt. San Jacinto! Another great shot of our local mountains.
 
Last edited:
JTolan's at it again, providing terrific images to demonstrate that the Earth is a sphere:

upload_2019-1-9_9-53-13.png
Source: https://www.youtube.com/watch?v=KxLwaaU1aNk&t=3m38s

The measurements in the picture are his own, and are mostly accurate for A-D, but between points E and F he gives an elevation difference of 2800 (or 2700) feet, due to a hitherto undiscovered "compression" effect. (Point F is actually at around 7300 feet)

The photo is taken from Point Dume at about 140 feet above sea level - somewhere close to 34.001988, -118.806015 (he doesn't give an exact location) - and it's 122.6 miles to the peak.

Though he's further away this time, and very slightly lower in elevation, he does actually capture more of the mountain - this is due to the obstructing ridge being at a lower elevation than the one in his previous shot.

This is the elevation profile showing the ridge that would be in the way for the flat earth model (San Juan Hills, at 62 miles from the observer):

upload_2019-1-9_10-0-51.png

Drawing a line of sight from the observer across the top of this ridge shows that around 8000 feet of the mountain should be visible.

The view of the mountain from Lake Mathews is showing in the region of 7700 feet, and a simple overlay reveals that we are seeing nowhere near this amount in JTolan's photograph:

san jacinto gif 2.gif

Based on that, as well as identifying other peaks, it appears that he's seeing somewhere in the region of 3600 feet.

Here's what the obscuration calculator predicts for the two models:

upload_2019-1-9_11-2-52.png

Notes:
  • I've entered the sphere earth obstruction as the ridge at 23 miles away. It's possible that it's a slightly taller one about 28 miles away, but the tool to figure this out precisely isn't currently working. The result, however, is more or less the same.
  • Given that the obscuring ridge is clearly one around 25 miles away, we could also use that for the flat earth figure. This would mean that over 10,000 feet of the mountain should be visible.
  • I could probably be around 5% more accurate in calculating the visible amount of the mountain. But given how clearly his shot supports the spherical earth, the extra time to do so doesn't seem worth it.
 
Metabunk 2019-01-09 22-24-23.jpg

This can give some useful perspective. I've added five polygons, each 200m apart, from 2400m to 3200m (use copy and paste and then change the color and height)

Metabunk 2019-01-09 22-26-49.jpg

View from pt dume
Metabunk 2019-01-09 22-28-42.jpg

Notice the yellow (2400m) is barely visible

KMZ attached.
 

Attachments

  • Jacinto.kmz
    4.5 KB · Views: 585
I've entered the sphere earth obstruction as the ridge at 23 miles away. It's possible that it's a slightly taller one about 28 miles away, but the tool to figure this out precisely isn't currently working. The result, however, is more or less the same.

It's kind of working now: it really is such a cool tool when looking at these kinds of pictures, and especially for identifying ridges and landmarks.

Screenshot (152).png
Source: https://tinyurl.com/yddmmpw2

Using this tells me that the ridge is largely the one at about 23.3 miles, 180 or so feet in elevation - basically in agreement with Google Earth.

Usefully, it also shows that San Juan Hill only obstructs more or less on the line of sight to the peak, so I think we can use that 23-mile ridge for both models (which would mean a flat earth line of sight hitting the foothills 78 miles away). This results in:

upload_2019-1-10_22-9-1.png

No prizes for figuring out which one's closer to reality.
 
Last edited:
Notice the yellow (2400m) is barely visible.

We've a slight discrepancy somewhere, Mick. If the yellow plane is at 2400m and marks the lowest visible point, that means about 2960 feet of the mountain is visible. My calculator says about 3700 feet, as does the panorama maker above, as well as estimating it using known points on the mountain:

san jacinto2 copy.jpg
 
We've a slight discrepancy somewhere, Mick. If the yellow plane is at 2400m and marks the lowest visible point, that means about 2960 feet of the mountain is visible. My calculator says about 3700 feet, as does the panorama maker above, as well as estimating it using known points on the mountain:

I don't think it's the "lowest visible point." There's a number of issues with the way Google Earth displays polygons, but it does give a good indication of the part of the mountain you are looking at.
 
The more I get to use that German panorama maker, the more I'm loving it. I was looking a bit closer at the point at Castle Rocks, and wondering why the line pointing to it went lower than the ridge. There's a really useful 10x zoom tool that let's you check in even closer:

crosshair on ridge.jpg

This is showing that the ridge we see is actually a higher one, but unnamed, approximately 2.6km behind Castle Rocks.

Sure enough:

2c. the ridge behind.png

It changes the figures above a tad, but not enough to alter the general estimate of how much we're seeing.
 
Last edited:
I was struggling to find a photo of what San Jacinto actually looks like in full from that direction, but I just came across this one:


Source: https://imgur.com/a/HWZZLoM

The red boxed part equates to the area JTolan shows in his photo.

There's no information about a location here, but it claims to be taken from roughly the same angle.

On another note, JTolan is the chap we've seen before, who shoots images with 'an infrared camera'. He believes it shows him something more than a normal camera can see. I've even heard it claimed, by a different flat earther, that "the infrared camera filter takes out all refraction, atmospheric lensing, and any mirage effects you might normally see on a hot day or where there's high humidity."

Now, I don't know much about infrared cameras, but I know they certainly can't "remove refraction".

Also, I'm used to seeing them shooting footage where people's heads' glow white and cold things show dark; JTolan's images look more like simple black and white photography to me.

In the video above, from about 8:00, he says a little about his set-up. It's made up of:
  • Monochrome astronomy camera
  • Celestron spotting scope
  • 850nm infrared filter
I'll bet we have some on here who understand what that filter actually does. But, in the meantime, if I go by a quick peruse of the wikipedia article on infrared photography I can learn that: this type of photography is termed "near-infrared", as opposed to thermal imaging, which is called "far-infrared"; that it's good for penetrating atmospheric haze; and that it's mainly just a way to create a nice, dreamlike photo effect - though it can, as JTolan says, sometimes reveal things that are otherwise difficult to see:


Visible vs. Infrared (900 nm LP) Aerial Photography of Old Hickory Lake, Tennessee, taken seconds apart.
As for the infrared camera, the 850 nm filter isolates what is called 'near infrared', a band of the electromagnetic spectrum in between 700 and 2500 nm. Not to be confused wit the thermal infared detected by the FLIR cameras (Forward-looking infrared), which extends much further into larger wavelengths, up to 14000 nm. Digital cameras have silicon-based sensors that naturally respond better in the near-IR than in visible light (400-700 nm) so they usually have a coating applied over the sensor surface to absorb this near-IR radiation and enable better contrast and dynamic range for the remaining visible radiation that makes thru the sensor coating. After all, they have to emulate the older chemical emulsions they are meant to replace.

Thus if you use a 850 nm filter on a regular DSLR, the combination filer+sensor coating is going to block most of the light that strikes the sensor. It becomes a very inneficient system. To overcome this, the author of these videos used an astronomical DSLR camera. By that, we mean a regular DSLR in which the IR-absorbing coating *wasn't applied*. Thus the combination filter+bare sensor will be optimal for registering images in the near-IR band.

As for the 'haze penetration power' of this combination, indeed it provides better contrast than images made in the visual spectral band, for one reason: the absorption coeffcieints of both Rayliegh scattering and molecular and nano-particulate haze drop dramatically as the wavelength increase. Going from 500-600 nm to 850 nm causes Rayleigh scattering to drop by a factor larger than 2, and absorption by a similar factor. The atmosphere essentially is more transparent and with better contrast in the near-IR.

The effects on refraction are negligible. The coefficient of refraction decreases by about 1% going from the visible to the near IR bands. And of course, air humidity doesn't play any significant role in atmospheric refraction. This is just a lies purposedly inserted into the flat Earth discourse by people that know it's a lie.
 
Last edited by a moderator:
I've been having a further look at some of JTolan's footage, since he also provides some really nice shots of the San Bernardino and San Gorgonio ranges in his video (from 3:04).

I made this panorama from three screenshots:

gorgonio panorama.png

I think even at first glance it's a beautiful flat earth debunk, given that we're clearly only seeing down to a little under 7000 feet above sea level for any of the peaks over a hundred miles away. There are so many analyses that could be done here, but here's just a couple:

1. The ridge in front of Little Green Valley is 16.1 miles away, with an elevation of 312 feet. This predicts a visible amount on the globe of 861 feet, and a visible amount on the flat earth of 5816 feet. Clearly, we're seeing nowhere near the latter, while the former can be quickly confirmed by measuring the difference in apparent height between Little Green Valley and Keller Peak - 840 feet - and noticing that it's pretty much the same measurement down to the ridge.

2. Looking at the unnamed peak to the right of Cucamonga, where the ridge in front is 17 miles away, at 436 feet above sea level. This gives predicted visible amounts of 3130 feet (sphere) and 5372 feet (flat). Again, taking the difference in height between Cucamonga and the unnamed peak of 2100 feet, we find that the difference on the photo down to the ridge is about one and a half times that - 3150 feet - again matching the globe.

I also looked again at his main San Jacinto shot and noticed that a point called One Horse Ridge is just below what he can see:

one horse ridge.png

One Horse Ridge is 3,872 feet below the peak of San Jacinto (and a little bit closer) which again tallies with all the other methods showing that we're only seeing about 3,700 feet of the mountain, which is exactly what we would expect on a sphere.

In a nutshell:

gorgonio panorama missing.jpg
 
Last edited:
There's something humorous about all this. I think we often find a popular perception that the curvature of the earth is somehow hard to notice, which I suppose is not entirely untrue depending on your reference frame. That said, the funny part is how applying some known distances and elevations even to landscape photography pretty rapidly makes earth's sphericity clear.

Nice work on these posts, @Rory, and your recent YouTube videos have been fun to watch. :)
 
I've just seen this video by Okrelos, who has written his own 3D landscape modelling software as part of his work. He says he became aware of flat earth belief through "Behind the Curve" on Netflix, and then saw JTolan 's San Jacinto image. He has modelled the whole area, and has a slider for the degree of curvature, between the actual value and flat.

Source: https://youtu.be/RK93TfSYeQU


The effect is interesting, to say that least. It animated the shift between viewing the full height of the mountain on a flat surface and the globe view, which precisely matches JTolan's view.

He is careful not to claim it as conclusive proof of the globe, since as he says there migbt be some effect that made it appear to be curved, but tgat it presents a large problem for flat earth claims.

Perhaps @Rory and @deirdre should try to interpret Okreylos in modelling the Mount Rainier view, too.

I found his video through an extract in this critique of JTolan's ability to identify and interpret features by Bob the Science Guy;

Source: https://youtu.be/-TEqAYEa_M4
 
I've just seen this video by Okrelos, who has written his own 3D landscape modelling software as part of his work. He says he became aware of flat earth belief through "Behind the Curve" on Netflix, and then saw JTolan 's San Jacinto image. He has modelled the whole area, and has a slider for the degree of curvature, between the actual value and flat.
Okrelos-flat-to-globe.gif

Excellent illustration. I've fudged this in Google Earth before by raising the camera, but it's not a perfect flat earth view like this.

But it's given me an idea - I can generate a "tour" for a given camera that will raise and lower the view while keeping the camera pointing at a distant point.
 
As a nitpick, the radius of the earth in (in #18) is about the same at any latitude. You have the right radius, but by bringing in latitude it implies that you are measuring the radius of the smaller latitudinal circle.
 
Check out this lovely extended panorama I made, taking all JTolan's images of the mountains behind LA:


Figures at the bottom show what's missing from what we would expect to see on a flat earth.
 
Last edited:
The EASIST way to debunk this is with the video author's own video . he shows a screen at 6:16 where he actually shows the angular size of the mountain to be 5 mrads… this is equal to 1/2 a degree. simple trig of a 11,000ft mountain at a distance of 123 miles is 2 (miles) elevation divided by 123 miles = .016 INV TAN gives .95 degrees OR, 10Mrads. but , we only see 5 mrads. 1/2 a degree...………… debunked!! half the mountain is being hidden. he shows it ON the video!!!! Hillarious….
 
The EASIST way to debunk this is with the video author's own video . he shows a screen at 6:16 where he actually shows the angular size of the mountain to be 5 mrads… this is equal to 1/2 a degree. simple trig of a 11,000ft mountain at a distance of 123 miles is 2 (miles) elevation divided by 123 miles = .016 INV TAN gives .95 degrees OR, 10Mrads. but , we only see 5 mrads. 1/2 a degree...………… debunked!! half the mountain is being hidden. he shows it ON the video!!!! Hillarious….

I'm not sure about the logic of that. The mountain peak is 10,834 feet above sea level. The amount we see isn't necessarily directly related to that figure, it depends on the intervening terrain, the prominence, etc. One would have to take those things into account first.

I'd also be very skeptical of using any millirad figure put forward by JTolan; they sometimes seem pulled out of thin air, like a lot of the figures he uses.
 
Last edited:
I'm not sure about the logic of that. The mountain peak is 10,834 feet above sea level. The amount we see isn't necessarily directly related to that figure, it depends on the intervening terrain, the prominence, etc. One would have to take those things into account first.

I'd also be very skeptical of using any millirad figure put forward by JTolan; they sometimes seem pulled out of thin air, like a lot of the figures he uses.
Rory, the mountain peak is , as you say, near 11,000ft.. this is 2 miles. And if the earth was flat, there would be a perfect right triangle from the peak down 2 miles... and 123miles to you (the observer). the angular size of the entire mountain would be 10mrads.. or .95degees. since his angular size superimposed on the picture shows 5mrads... this would equate to near 5000ft missing from the mountain. where is the logic flawed?
 
A somewhat unrelated part of the same video is the horizon angle measurement at 3:26,
I was testing out the notion that the horizon rises to eye level, and using an app on my phone that takes advantage of the inclinometers, I placed the crosshairs down at about -3.3 degrees which is where the horizon should be from that high up in the air, yet I could clearly see the lake. This was really something else. I really got hooked on this flat earth.
Content from External Source

The diagram in the upper right showing a dip of 3.4 degrees is about right. It does seem worth investigating why the crosshairs are well below the horizon at -3.3 degrees.

However the explanation is not that the earth is flat. Rather, the camera is simply tilted along the roll axis, with the horizon being higher on the left. I suspect the value of -.1° shown on the left is the roll angle, but I don't know about that app. In any case, horizontal compression with exaggerated contrast makes the tilt clear:

This also shows the curve of the horizon.
 
The diagram in the upper right showing a dip of 3.4 degrees is about right. It does seem worth investigating why the crosshairs are well below the horizon at -3.3 degrees.
Those theodolite apps can be quite inaccurate. Also on a plane, it has to be in constant speed level flight. A very slight turn will change the down vector.

Refraction will also raise up the horizon about 0.5 degrees from there. Maybe more.
 
I've seen JTolan experiment with the Dioptra app before: it's not very accurate, and he doesn't seem very sure about how it works. I did some of my own tests with it (below) and, as other people had found, concluded that it wasn't really up to the task. The Hunter app for the iPhone, though, is pretty good.


Source: https://www.youtube.com/watch?v=FOECZbbnS54
 
Refraction will also raise up the horizon about 0.5 degrees from there. Maybe more.

I'd be surprised. Did you perform the integration? In the metabunk calculator, the terrestrial refraction estimate for geodetic surveying can't be used for determining the horizon angle from an airplane. The estimate assumes constant pressure (apart from temperature gradient), whereas we are going from 0.2 atm to 1 atm.
 
Last edited:
I'd be surprised. Did you perform the integration? In the metabunk calculator, the terrestrial refraction estimate for geodetic surveying can't be used for determining the horizon angle from an airplane. The estimate assumes constant pressure (apart from temperature gradient), whereas we are going from 0.2 atm to 1 atm.

Constant pressure? Where is that assumed? The biggest factor in terrestrial refraction is the decrease in pressure with altitude.

The refraction of celestial objects near the horizon is about 0.5 degrees (one solar diameter), so it's going to be about the same the other way around.
 
Constant pressure? Where is that assumed?

In the terrestrial refraction estimate used by the metabunk calculator (operative word being "terrestrial").

There isn't a start pressure and an end pressure. There isn't a start temperature and an end temperature. In order to obtain the answer you seek, you will need to integrate from the airplane to the ground. You probably want to use standard atmosphere values:

-0.0065K/m

11336m, -56.5C, 0.21atm

0m, 15C, 1atm
The biggest factor in terrestrial refraction is the decrease in pressure with altitude.
Indeed, that is why the change from 0.2atm to 1atm needs to be part of the calculation.
The refraction of celestial objects near the horizon is about 0.5 degrees (one solar diameter), so it's going to be about the same the other way around.
Not really. Do you know of any telescopes that are 11336m high? And the horizon is not a celestial object. The light from a celestial object comes from where there is no atmosphere, and thus undergoes lots of bending. The horizon is the opposite condition, from deep inside the atmosphere at 1atm.
 
In the terrestrial refraction estimate used by the metabunk calculator (operative word being "terrestrial").

There isn't a start pressure and an end pressure. There isn't a start temperature and an end temperature. In order to obtain the answer you seek, you will need to integrate from the airplane to the ground. You probably want to use standard atmosphere values:
The lapse rate for pressure is baked into that equation, as it's mostly constant and linear at surveying altitudes. Refractive index is a function of both pressure and temperature.

Not really. Do you know of any telescopes that are 11336m high? And the horizon is not a celestial object.
Right, but refraction works exactly the same in both directions. So observer->Sun is the same as Sun->Observer. Replace sun with the plane (as it's out of the major parts of the atmosphere), and the observer with the horizon.

Hmm, but let me numerically integrate it and see...
 
Okay here it is in my refraction simulator, overlaid with and without refraction
Metabunk 2019-09-21 16-21-40.jpg
That's 1° vertical FOV, so that's a bit under 0.25° change over geometric. Less than the 0.5° I thought.

I use the Ciddor equation for refractive index and ray-tracing parallel rays to determine the bend
 
The lapse rate for pressure is baked into that equation
I wasn't talking about lapse rate (which, yes, is constant for our purposes (up to 11km)). The model for the terrestrial refraction estimate is based on a spherical shell of air. The base of the shell is pegged to reference values for temperature and pressure.

So which reference values for the shell are we going to use? Ground values or airplane values? The real answer would involve integrating across them. However we may obtain some bounds without integrating. With a viewer height of 11336m,

-56.5C, 0.21251atm, -0.0065K/m --> 0.111 degree horizon lift

15C, 1atm, -0.0065K/m --> 0.305 degree horizon lift

The answer lies between those two.
Right, but refraction works exactly the same in both directions. So observer->Sun is the same as Sun->Observer. Replace sun with the plane (as it's out of the major parts of the atmosphere), and the observer with the horizon.
I think both our calculations show that treating an airplane as a celestial object is not a good idea. While 0.2 atm might be "out of the major parts of the atmosphere", among other things there remains the relatively steep angle at which sunlight enters the atmosphere during sunset.
 
So that's a bit under 0.25° change over geometric.

-56.5C, 0.21251atm, -0.0065K/m --> 0.111 degree horizon lift

15C, 1atm, -0.0065K/m --> 0.305 degree horizon lift

The answer lies between those two.

Nice to see how your two different methods reach more or less the same answer: split the difference between Antithesis's results and we get 0.21°; close to Mick's "a bit under 0.25°".

And, of course, for purpose it's clear enough: if the geometric prediction is -3.3° (for a plane at 35,000 feet) and the actual is -3.1°, then it's very close to what we observe in reality, and a far cry from that which the flat earth notion predicts (granting that there would even be a horizon on a flat plane, which there wouldn't be).

Always good to see folk striving for that extra degree of precision. :)
 
Last edited:
Thanks for mentioning the linear interpolation of 0.21°. I was overcautious to avoid it, now that I think about it.

This is from youtuber Wolfie6020:

Geometric dip is 3.6° (calculation). The refraction numbers are similar.

I think 0.2° is a decent ballpark for the refracted lift of the horizon from a high altitude airplane.
 
Last edited:
The EASIST way to debunk this is with the video author's own video . he shows a screen at 6:16 where he actually shows the angular size of the mountain to be 5 mrads… this is equal to 1/2 a degree.

Er . . . I get 5 mrad = 0.286 degrees (=(180/pi)*5/1000).
 
Just as an aside...
Back when aerial navigators used sextants during flight, they had a problem. The dip of the horizon is so great at high altitude that ordinary sextants are difficult to use. So sextants with an artificial horizon were used.

Navigators for 200 hundred years have had to deal with the dip of the horizon. A million times? At least.

The idea of someone suddenly coming along and casually disproving the existence of the dip is...
Al Biruni used the dip angle to get a very good measurement of the Earth’s radius about 900 years ago.
 
Back
Top