
https://www.metabunk.org/KMLTool/
The Metabunk KML tool takes one KML/KMZ file containing a Google Earth camera (and optionally some other stuff) and spits out a KMZ file that contains a variety of useful stuff. The initial intent of the tool was simply to show the view volume in Google Earth, to help understand what the viewer was looking at. This rapidly evolved as I just kept adding things, like various plane (eye level, horizon), and lines of sights. It continues to evolve and contains a few experimental outputs that will change over time. More will be added.
What is a Google Earth Camera? It's actually a Google Earth "Photo Overlay", which you get with "Add Photo"
The purpose of adding a photo is to match up a photo in 3D, so you can duplicate the view in Google Earth. For example, the top image in this post is showing the camera that first this photo:
When to match this, you first find where the photo was taken from, and then position the camera in Google Earth there, pointing roughly in the right direction. You then "Add Photo" and you get a box like:
You'd normally then adjust the transparency, and adjust the heading, tilt, and FOV until the photo matches the Google Earth view. For the KML tool you need to set the height to "Above sea level" (sometimes you will have to toggle this to get it to stick).
This gives you a "Place" with a camera icon, which you can then save, and load into the KML tool.
So just load it into the KML too, and it will spit out a KMZ file, which you can then load into Google Earth.
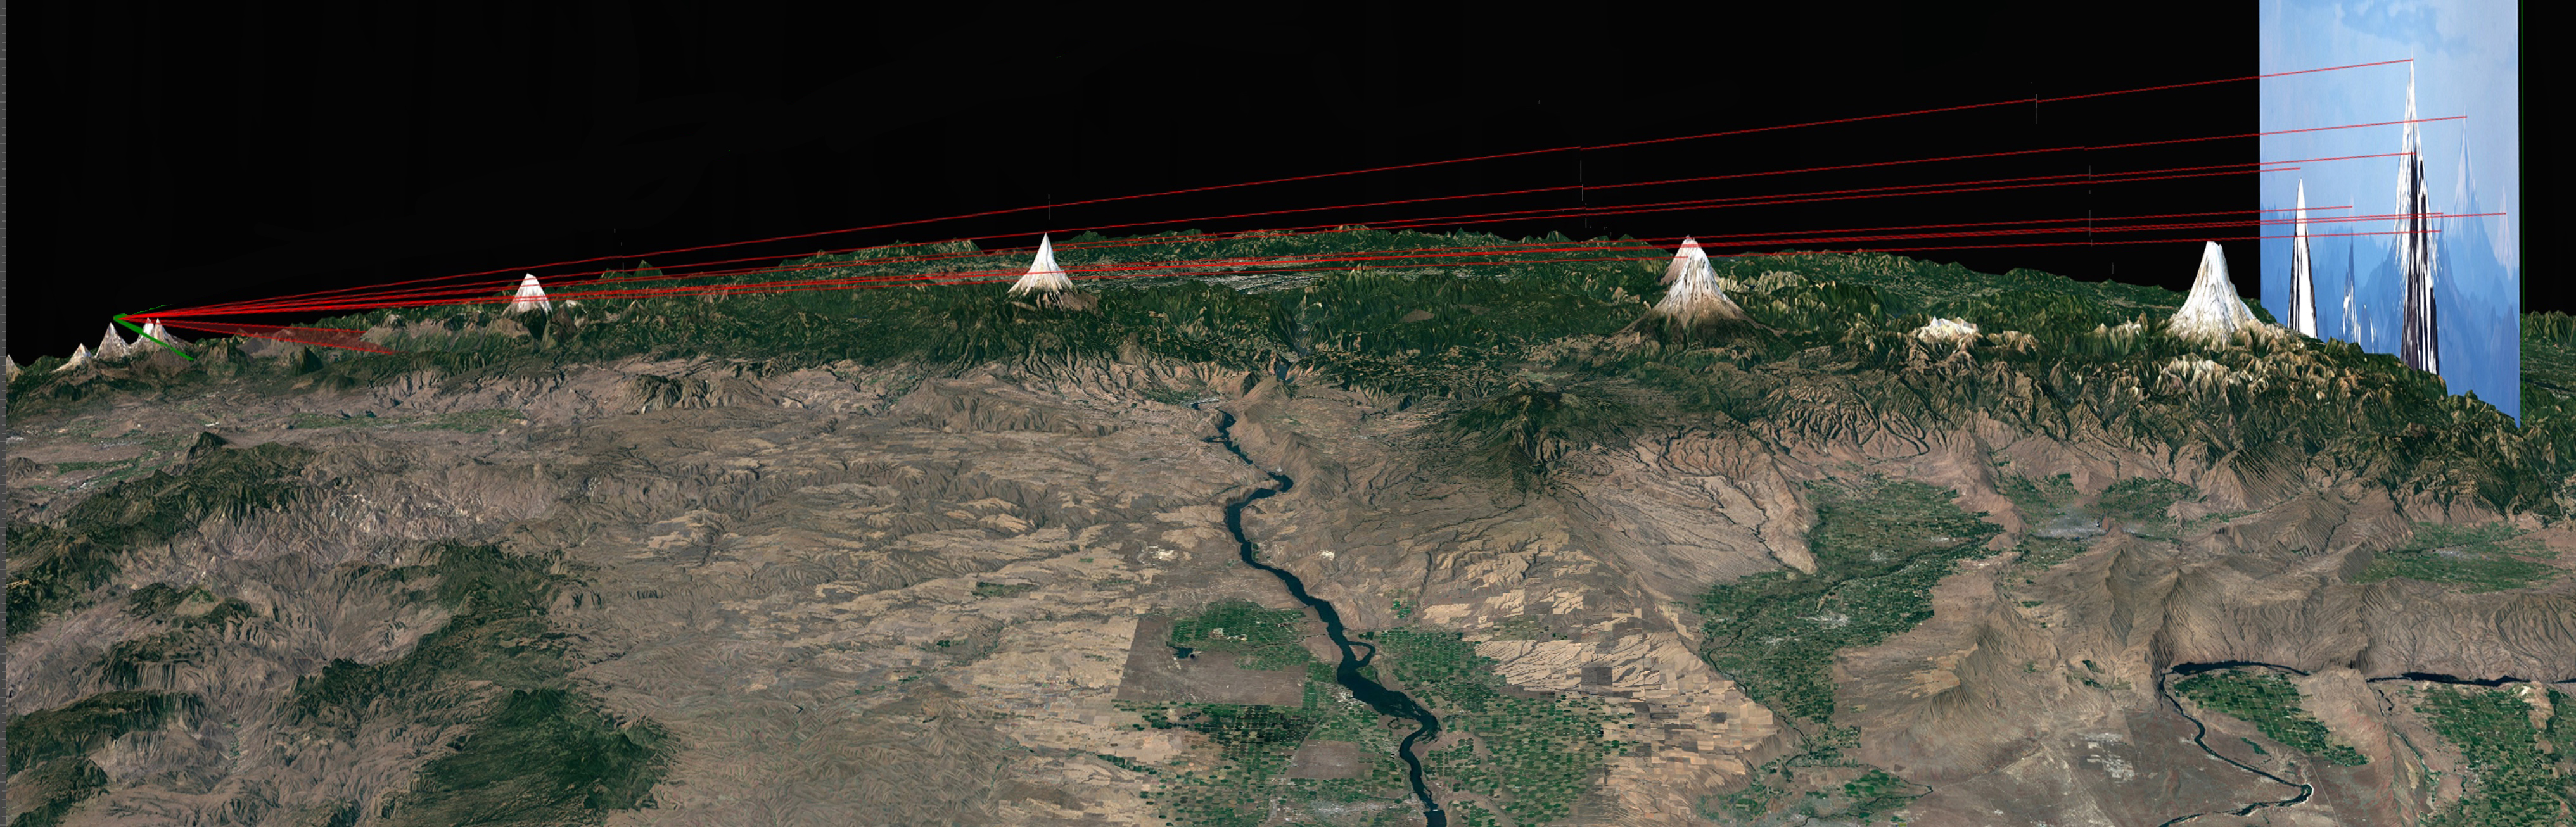
You can do this with just a single photo overlay (camera), but you get more options if you create a folder, put the camera inside this folder, and then add some placemarks. Like here, where I've added a placemark on the top of each peak in the view
And put them in a folder with the photo overlay (camera)
This, in turn, spits out a folder of fun and useful stuff, some of which is switched off by default, and all is subject to change.
You can turn these on to see what they are, and expand the sub folders for more options. But briefly:
- Frustum - A wireframe outline of the 3D field of view. The size of this is set at 100KM by default, or just past the furthest placemark (the best way of setting it)
- End Image - The photo, put at the end of the Frustum
- Horizontal Planes
- Frustum Center Plane - half way down the frustum, the "line of sight" of the camera centerline.
- Eye Level - A horizontal plane starting at the camera (horizontal meaning parallel to the Earth's surface below the camera)
- Horizon Plane - a plane from the camera, just skimming the horizon. This should represent the "geometric hidden." In reality, the atmosphere usually raises things up a bit via refraction, so you will see more. I plan on adding a curved surface that would be the refracted version of this.
- Lines Through Points - Lines from the camera, though each placemark, and on to the end of the frustum.
- Images at Points - the photo, positioned at each individual placemark. Useful to see how well things fit
- Planes Through Points - frustum planes that pass through each point. Usful so you can see where the top of one peak slices though a different mountain.
- Point Drops - Shows the "Flat Earth" position of each placemark, and a line showing how far it is below this position on the globe.
- Point Drops on Rear Image - collects them all on the back image, to show where they would be in the photo (ignoring refraction)
- Source Data - a copy of the original folder (so don't leave any personal data in there if you plan on sharing)
- AB Tour - (experimental) A tour which will raise and lower the camera while zoomed in on the distant scene.
Source: https://www.youtube.com/watch?v=QxjUgCEvGwk
- Ocean Surface - A blue grid at 0m altitude. This was added as Google Earth does not render the surface of the ocean very well sometimes. So adding this grid means there's a perfect water surface showing where the horizon is. Usuful for the AB Tour (when it works).
It very much a work in progress, but I'm releasing it now as it might be useful to some people.
Last edited:

")